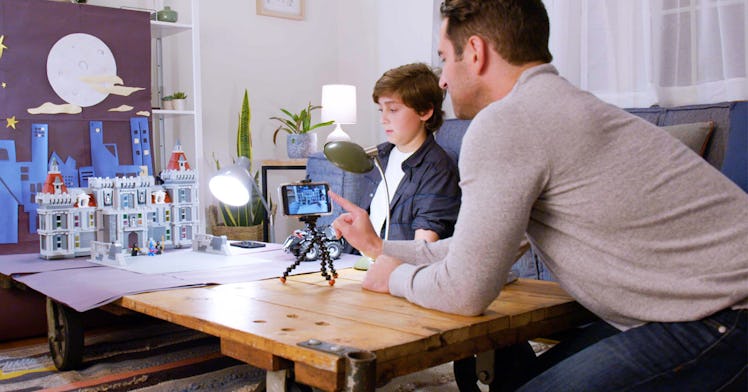
How to Make a Stop-Motion Fan Film Starring Your LEGO Batmobile™
When you have a LEGO® toy as awesome as the new App-Controlled Batmobile, you have to put it on the big screen. Here's how.

The following is brought to you by LEGO®, makers of the new App-Controlled Batmobile.
LEGO minifigs aren’t just the stars of Hollywood blockbusters; these expressive little figures and the sturdy contraptions you and your kids build for them are the perfect basis for stop-motion mini-movies anybody can make at home. And when you have a set like the new LEGO App-Controlled Batmobile, you’re going to want to show it off in your very own LEGO Batman™ fan film.
No film experience? Not to worry. It’s incredibly easy to make a professional looking stop-motion film with a few tools and materials you have around the house. Best of all, you’ll be bonding with your kids as you work together to make your action-packed vision come alive.
Step 1: Plan Your Film
Start by making a storyboard. Draw a grid onto a piece of paper and in each box and help your kids sketch out each step of the film. Underneath each picture, write a sentence describing what’s happening. Spending time planning out your film will help you figure out the flow of your film’s action, determine what sort of props you need, and decide where you want to position your camera during filming. Plus it’s a great way to help your kids learn about story arcs.
Then again, no one says you have to make a storyboard for your film. There’s nothing wrong with simply setting up your film set and seeing where your imagination takes you.
Step 2: Prepare your Props and Equipment
It’s time to gather your materials. Along with your LEGO App-Controlled Batmobile and other LEGO creations that will star in your film, you might want to grab a few extra minifig heads with various facial expressions if you want your actors to be especially effusive. You will also want to film on a sturdy surface or table that won’t be at risk of getting jostled or moved around during shooting. In terms of lighting, a simple desk lamp will do, provided you tape or weigh it down so it doesn’t get shifted halfway through your shoot. (Also, if you think your shooting might take a while, close any nearby curtains so you don’t inadvertently capture outdoor light changes.) As for a camera, your smartphone will do the trick, provided you use a tripod or similar device to make sure it remains as still as possible.
Step 3: Lights, Camera, Action!
Position your LEGO creations for the first shot and carefully take a photograph. Then ever so slightly move your actors bit by bit, taking another photo after each move. A good rule of thumb is to shift your minifigs a half inch or two paces on a LEGO base for each new shot – although you can move your pieces more or less than that depending if you want them to look like they’re speeding up or slowing down.
Be careful you don’t accidentally move or knock down any parts of your set or equipment as you film your movie – it will be hard to put everything back exactly where it belongs. Most importantly, be patient! Remember that you will be taking roughly 15 photos for every second of film. So if you aim to make a 30-second movie, you’ll need 450 photos.
Step 4: Edit Your Film
If you don’t already have an appropriate movie-making program, find and download a free one – there are lots of options online. Upload your photos into the program and then, if possible, set the program’s frame rate setting to 15fps (frames per second). Next, go through your shots, deleting any unwanted images. If you’re feeling fancy, feel free to add a title, credits, and theme music.
Step 5: Enjoy the Show!
Grab some popcorn and gather the family to watch your finished film. LEGO Batman™ would be proud.
© & TM DC Comics. (s18)
© & TM The LEGO Group.
This article was originally published on