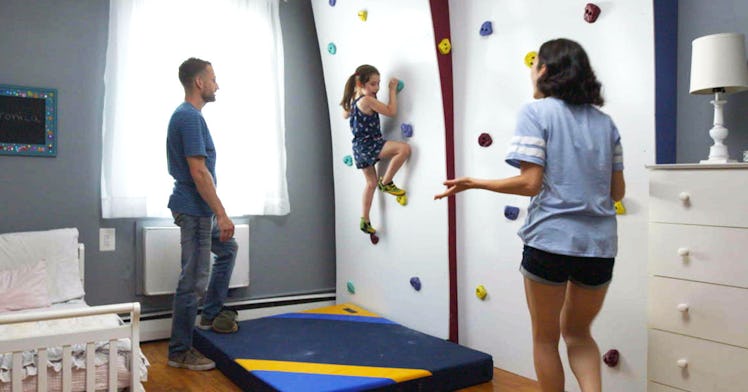
Transform Your Child’s Bedroom Into an Indoor Climbing Gym
Climbing walls are fun for kids, provide great exercise, and are not that hard to install. Here's how to transform your kid’s room.

This story is sponsored by Krylon®, the spray paint brand that can easily restore, refresh, recolor, and revive any project.
Imagine creating a space in your house where kids can blow off steam by literally scaling a wall. If that sounds like someone else’s mansion, hear this: Climbing walls aren’t only really trendy right now, they’re actually not that hard — or expensive — to make.
Climbing is great for kids’ fitness, flexibility, motor skills, and creative stimulation. Not to mention how cool it is for your kid to show off their very own climbing wall when friends come over to play. With touches of Krylon® Fusion All-In-One™ colors such as Gloss Sunbeam and Gloss Blue Hyacinth, the climbing wall you’ll make with this project looks good enough to be wall art, except it gives kids a serious workout, too. With the right assembly (and a little assistance from mom and dad), climbing walls provide a safe space for kids who can’t sit still to burn off extra energy.
Building one in your child’s bedroom or the family playroom is easy with our step-by-step instructions, supply list, and a few key colors of Krylon® Fusion All-In-One™ spray paint.
What You Need:
- Stud finder
- Pencil
- 12 4-foot-long two-by-fours
- Saw
- A box of 3-inch screws
- A box of 5-inch screws
- Two sheets of 4’ x 8’ plywood
- Sandpaper
- Rag
- Two painting cloths
- 1 can of Valspar® Satin The Perfect White™
- Purdy 9″ roller
- Paint tray
- Krylon® Fusion All-In-One™ spray paint in Satin Beach Glass, Gloss Sunbeam, Gloss Blue Hyacinth, and Gloss Burgundy
- 32 unpainted, bolt-ready rock-climbing hand holds
- A box of bolts, nuts, washers
- Drill
- Measuring tape
- C wrench
Step 1: Build the Frame
Start by measuring the dimensions of the wall you will be using (this project assumes an 8-by-8-foot wall, but you can modify as space requires). Then, use a stud finder to find the studs in the wall and mark off their locations with a pencil. (You will use these to secure the frame.)
Head outside and assemble 12 four-foot-long two-by-fours (pre-bought or cut with a saw). These will serve as crossbars for your frame. Cut a 1-by 8-foot piece of plywood. Create a frame by screwing nine of the planks in a row along the long back edge of the plywood and screwing the remaining three planks in a row along the front long edge of plywood (spacing them an equal distance apart).
Cut a second 1-by 8-foot piece of plywood and bookend it to the open sides of the crossbars with screws to complete the frame. Grab a can of Krylon® Fusion All-In-One™ Gloss Burgundy paint and spray the entire frame, holding the can about 8 to 10 inches away from the wood and moving your hand in even back-and-forth movements. Let dry.
Carry the frame inside. Using 5-inch screws, secure the 9-crossbar side of the frame to the wall vertically, using the existing marked-off wall studs to secure each crossbar in two spots.
Step 2: Paint the Wall
Back outside, sand the edges of a 4’x8’ sheet of plywood and wipe with a dry rag. Lay out a painting cloth or tarp in the driveway and place plywood on top to be painted.
Grab a can of Valspar® Satin The Perfect White™ and a Purdy 9” roller. For best results, paint in long V-shaped strokes. Leave to dry (30-60 minutes).
Lay out a second painting cloth or tarp and divide rock-climbing handholds into four piles. Using Krylon® Fusion All-In-One™ Satin Beach Glass, Gloss Sunbeam, Gloss Blue Hyacinth, and Gloss Burgundy, spray the pieces in each pile the same color, rotating them as they dry so that the entire object is coated. Leave out to dry completely.
Step 3: Attach and Build the Wall
Size up the holes in the handholds with your collection of bolts, then drill holes in the plywood of corresponding size, being careful to place hand holds a safe distance from the frame attachment points.
Carry the plywood wall into the house, and work with a partner to screw it onto the frame. One person lines up the plywood with the frame and holds it in place while the other person drills. Then, screw handholds into the plywood using bolts, nuts, and washers. (Secure each one tightly with a C wrench.)
If space allows, build a second wall that can sit side-by-side with this one, to double the climbing fun. That’s it! Give your wall a test-drive yourself, making sure it feels stable, then invite the kids to begin their climbing adventure!